Showing posts with label original henna tattoo pattern. Show all posts

Thursday, July 9, 2009

Full Palm Henna Tattoo - paste on & paste off

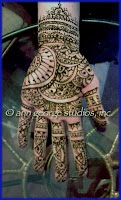
henna tattoo full palm paste onThis is a photo on an original henna tattoo design for the full palm. The pattern started and the wrist and was worked down onto the palm and finally the fingers.

This henna tattoo was done with a fairly wet paste, so there was plenty of time for the henna to be absorbed into the skin. This wet paste yielded a good finished color as you will see below.


Here is a photo of the henna tattoo with the paste off the skin. As you can see (click the photo for a larger view) the henna stains different parts of the hand different shades of red to reddish brown.
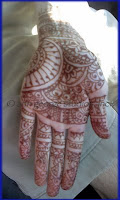
24 hours later henna tattoo colorThis henna paste has only been off the skin for 24 hours, so it will take another 24 hours for the final color to show up.

Many people want to know how long a henna tattoo will last. Spirit Vision Henna uses fine, natural ingredients with no chemical additives. The paste is made to give the darkest color possible, but aftercare is really important to getting a long lasting stain.

If you will leave the paste on the skin (first photo) for at least 6 hours, and if you will keep olive oil on the design (apply at least twice a day) and you are able to stay out of water for at least 12 hours after the paste is off the skin, then you will get the best color.

The FAQ page will address many common questions about henna tattoo. Of course, you are also welcome to call or email for more information.
Sunday, May 24, 2009

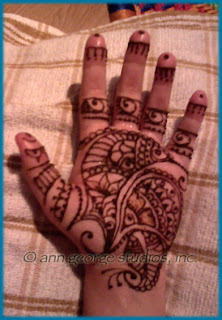
Full Palm Henna Tattoo

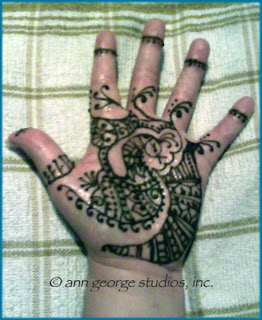
henna pattern quick palm henna patternHere is a quick pattern for a full palm henna tattoo with a floral feel.

My customer wanted a traditional henna look without bridal pricing... which is when the use of negative space makes a henna tattoo come alive, seem very full & traditional, without requiring more than 15 minutes or so.

This pattern starts at the wrist & then uses two double paisley patterns to contain the bulk of the design. Henna rings were used on the fingers, with little ring jewels on the tips.

Henna will naturally flake off over time, and of course with movement, so the rings were placed between the finger joints. Placing the henna paste away from the joints of the fingers made this an easy to wear henna pattern for a busy shopping day. The henna tattoo was sprayed several times with a a lemon sugar glaze to help it stay in place.

full palm henna tattoo with peacock As it is now henna season, it's best to call ahead to schedule your henna tattoo at The Midnight Sun. Visit Spirit Vision Henna for more information. This month's special is one full palm tattoo, similar to the one you see here, for $25.00. If you want both palms done, then it is best to have a driver.. or to choose a pattern similar to this second pattern.

This client had to drive for the little party that stopped by the shop. As you can see the henna design makes use of "negative space" to enhance the peacock pattern and to leave plenty of room to handle the steering wheel while driving a stick shift car.

If you have another style of henna tattoo in mind, no worries. There are lots of pattern books to look through, however the special pricing is for "Chef's Choice" henna. This means that your artist will create a custom design based on your preference for tribal, floral, Arabic or Indian styles.

Tuesday, May 19, 2009

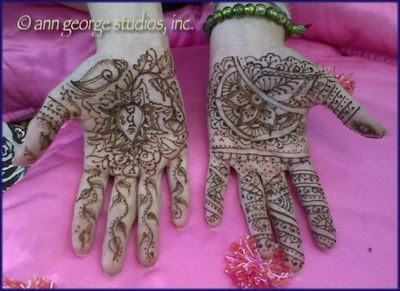
Wedding Henna - Full Palms Bridal Henna Tattoo

wedding henna tattoo full palms
It is always an honor to be included in wedding day celebrations. I am pleased to publish a photo of the brides henna tattoo.
She choose to include several spiritual symbols in her henna, and from those images, the henna pattern unfolded in that energy. Here you see the photo of both palms, with the henna paste on the skin.

Please feel welcome to contact the artists of Spirit Vision Henna for your wedding, celebration, gathering.. or just for a "girls night out". We have a large collection of pattern books, as well, Ann George is an accomplished free hand artist.

Monday, January 5, 2009

Bold henna pattern for the palms. Quick & easy.

bold henna pattern for palms of handsYou can drive with henna palms! If you choose a bold pattern like this one it's very easy.

You will notice that the left hand is full of henna.. but just has design going half way up the fingers & little spots to finish.

The right hand design compliments the left.. leaving plenty of free space for the little household tasks that might make full palms & fingers pattern too difficult to fit into your modern lifestyle.

From start to finish, this tattoo took 35 minute to complete.

Using bold lines & negative space to compliment the shape of the hand give a striking pattern that is easy to wear.

This is an original free hand henna tattoo by Ann George of Spirit Vision Henna, Jacksonville, Florida.

Monday, July 14, 2008

Arabic Style Henna for the Arm - Chef's Choice Henna

arabic style henna tattoo for the arm - bridal style henna tattooI am always grateful to my trusting henna clients who order "Chef's Choice". I mentioned to Rachel that I was really inspired by the excellent work of the artist who is featured in the henna video below, and that I wanted to practice that more intricate style of henna.

Lucky for me she agreed and here you see the result. This photo shows the henna paste on the skin.. and not black henna. We used the '08 crop of Jamila Henna so I have no doubt the finished color will be excellent! The henna powder created a nice gummy paste when I mixed it. The paste flowed easily and I could "drop lines" of paste on the skin when creating the tattoo, so I really enjoyed that.

I feel so fortunate that highly skilled henna artists are willing to post their work in action. I am a visual learner, and it is so wonderful to watch other artists think.
So.. I went browsing around and found a great live action henna video from Nepal that I will post in the near future. Right now, I am inspired to do a bit more bridal quality henna for practice & will post those photos soon.

Namaste 'til next time.

Monday, June 30, 2008

Cajeput Oil & Pomegranate Juice! Great Henna Color

original henna pattern palm of hand red finished colorI used cajeput oil in this mix to get this great finished color only 14 hours off the skin. This is the 2007 crop of Jamila henna giving this good color. The henna paste was allowed to remain on the palm of the hand for about 6 hours.
I was lucky to get this foto before the beach party. I am happy to share it with you.

For those new to Spirit Vision Henna.. this is a "chef's choice" pattern. It is an easy way to get a unique henna tattoo that fits your style & your budget.

Be sure to click the photo for a larger view. Also, to see more henna tattoos visit Spirit Vision on myspace.

Tuesday, June 10, 2008

Impromptu Butterfly Henna Tattoo

henna butterfly tattoobutterfly henna tattoo

Here are photos of a butterfly tattoo garden I did on Saturday. My client really enjoys floral designs & free style henna, so I am able to try new patterns.

The first photo shows the design on the inner wrist. The second photo shows the design as it moves from the inner wrist to the outer arm. In this way, there is a little bit of henna pattern visible, but the main pattern is "hidden". I am still working to perfect my butterfly skills, and hope to post more fotos in the future.

To see larger images, just click the photos. For more henna tattoos for the arms, visit Spirit Vision Henna.

Wednesday, May 28, 2008

Bridal Henna for the Palm - A 35 Minute Design

bridal henna tattoo palm tattoo

Here is a photo of a traditional henna tattoo for the palm. The design is a synthesis of traditional India henna style and a touch of the bold Arabic fashion.

After viewing the work of many fine artists, and benefiting from some videos, I made a thinner paste than usual and used a mylar cone to create this tattoo.

With a thin paste (almost like tempra paint texture) and a very fine tip on the cone, I was able to do more intricate mehandi much faster than ever before.

I started at the top most portion of the wrist, marked out the primary design areas first, then filled those in with finer lines.

I followed the same process for the hand... which is how I achieved the reverse image paisley on the palm.

The dark centers of the flowers that surround the paisley help set it off. Each finger is different, which gives a spontaneous look to my eye. I will post the foot tattoo pattern tomorrow.

Friday, May 9, 2008

Let your henna dry first.. then gild it.

gilded henna tattoo

Here is a photo of a gilded henna tattoo. This is also an example of the "Chef's Choice" option, which means you give me your hand, tell me how much you want to spend, and wait to see the result.

I realized again on Saturday that because I am familiar with henna and the process of gilding, that I may not always give a complete explanation to new customers. For that reason, I will now go over some basics. If this is old news to you.. please forgive.

The dark colored lines you see in the picture are of henna paste that has dried, been glazed with lemon sugar, and is "stuck" onto the skin. This dried paste is not the finished tattoo. Under the paste, henna is interacting with your skin to stain it some shade of red to reddish brown. The finished color of your tattoo will develop over the next two days. The initial color you see when the paste is removed will darken.

The other colors you see in the photo (click the photo for a larger image) are very temporary.. they will only last a day. The process of adding these temporary body paints is called gilding. If you want your henna tattoo gilded, there is no extra charge. There is extra drying time. It is very important that the henna paste (the darker lines) dries before the gilding is added. The gilding colors are made with cosmetic powders and glitters in a carrier base that is made of hair setting gel. This gel is a liquid, and can blur the henna tattoo if applied to early.

Now, if you are new to henna, it is important to remember that you must let your henna tattoo dry before becoming active. Failure to do so results is a smudged or running tattoo.. particularly if you spill a beverage on the design!!! Touch ups are sometimes possible, sometimes.. not so possible, but if you do need one during the henna party, you may have to wait until I have finished the tattoo I am working on.

Sometimes, hennas are smudged long after you've left the shop & a repair is not possible. Should this happen, no worries. Just remove all the henna paste from your skin, apply a vegetable oil.. and wait for the color to develop over the next few days. More information as well as FAQ are online at spiritvisionhenna.com

Monday, October 8, 2007

Amys's Henna Tattoo

Here is an original henna tattoo pattern based on traditional concepts of course! Amy & I were sititng lake side on a breezy morning when we did this art. I tried to create a pattern that fit here hand, her mood, and the day.

We were able to take this photo of the henna paste still on the skin. Her hand is resting in an old orchard bird bath! I really like this photo.

Of course we are now drawing to the close of henna season here, although if you call ahead & make an appointment, we can still do great art!

Monday, June 18, 2007

Traditional Indian Henna for Feet

Want to see all the images of this henna pattern? Just CLICK HERE for the slide show.

This is a Sunday afternoon henna moment for a friend. It was a very peaceful time, and a great help to me to be able to practice bridal style Indian henna.

Come back.. I hope to have photos in color soon.