Monday, April 19, 2010
Bridal Style Henna Tattoo - Full Back Hand Henna Pattern
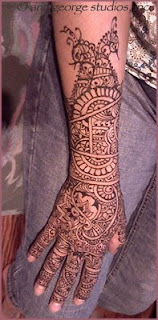
The design actually started above the wrist with the floral cuff, then moved down to the back of the hand, and finally to the fingers.
From this angle, it is easy to see the peacock built into the pattern, so the wearer gets to enjoy the lovely bird.
The viewer will notice the floral cuff first, and then the eye will be drawn down the hand to the tip of the fingers.
This pattern was created by drawing a series of shapes that were then outlined and finally filled in with traditional mehndi components to give a full hand tattoo.
The use of negative space is very important when creating free hand henna designs. A bit of space between design elements catches the eye.
In my experience, when I forget to use negative space, my tattoos seem cluttered, visually busy, or it's just plain hard to see what I drew. I hope you find this little note helpful.
For more information about drawing henna tattoo, there are wonderful live videos on this blog. Check the labels to the right of this post to find one you like. Namaste.
Sunday, March 28, 2010
Bridal Henna Palms - Two Artists at work
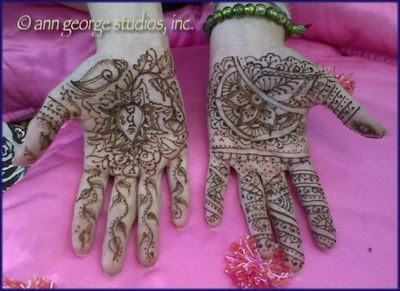
This photo shows the work of two artists working together to create a wedding henna.
Each has a slightly different style, but you can see that the patterns are complimentary, and accomplished in 45 minutes for both hands.
We will continue to work to improve so that we may provide intricate full bridal tattoo in a timely manner.
Please contact Ann George at 904•993•7466 for more information about henna tattoo for wedding parties, and other events.
Wednesday, November 25, 2009
Traditional Henna Tattoo - Great Art in 20 minutes!
Art like this takes about 20 minute to complete. If you choose to have a spritz of the lemon sugar glaze applied to secure the henna paste to the skin, you may want to wait an additional 10 minutes for the henna paste to dry a bit before the glaze goes on.
Henna tattoo is a heat activated art form. As temperatures in Jacksonville Florida become cooler.. henna will no longer be offered on a walk-in basis at the Midnight Sun.
Henna gives the best finished color in the summer time because the weather is warmer, we tend to sweat.. thus the pores open & the henna paste can penetrate the skin.
Also, when we are sweating, our perspiration helps the paste stay moist on the skin.. and this also helps to get a good finished color.
Henna parties are still a good way to experience henna during the cooler months. For more information about henna parties, please contact Ann George Studios, Inc. via the Spirit Vision Henna website.
Wednesday, November 11, 2009
Bridal Henna Tattoo for the Back of the Hand.
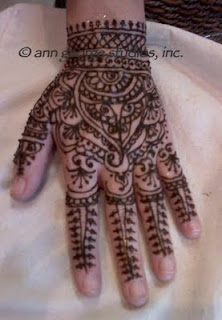
 Here is a photo of a traditional henna tattoo pattern for the back of the hand. The fine lines and full pattern are typical of a traditional henna tattoo pattern from India.
 Many customers also order this as a "bridal" henna pattern, although this tattoo does not go all the way to the elbow as is the custom for many brides.
I used henna paste made with finely ground Jamila henna powder, the 2009 crop, which made the paste flow easily from the hand rolled cone. This year's crop of Jamila henna is wondefully "gummy" and make a very workable paste.
Friday, May 22, 2009
Bridal Henna - Free Hand Design
 One of the great joys of the web is that it enables me to see the great skills of other mehndi artists.
This photo is inspired by the work of the fine artist at Hasina Mehnd. AFter seeing one of her more recent henna designs, I knew I had to work a bit harder to be able to offer my customers the best of traditional henna.
I was lucky to have a willing volunteer, and about an hour of to do this design. The design went along rather quickly until I got to the middle of the palm of the hand. This is traditional henna, and I hope to be able to offer more photos, more often.
If you would like to have a henna like this, it is best to make an appointment. This kind of henna takes a plenty of paste, space & free time.
I hope you will be inspired to enjoy this lovely body art.
Ann George
Spirit Vision Henna Tattoo
Tuesday, May 19, 2009
Wedding Henna - Full Palms Bridal Henna Tattoo

It is always an honor to be included in wedding day celebrations. I am pleased to publish a photo of the brides henna tattoo.
She choose to include several spiritual symbols in her henna, and from those images, the henna pattern unfolded in that energy. Here you see the photo of both palms, with the henna paste on the skin.
Please feel welcome to contact the artists of Spirit Vision Henna for your wedding, celebration, gathering.. or just for a "girls night out". We have a large collection of pattern books, as well, Ann George is an accomplished free hand artist.
Saturday, January 17, 2009
It's just too cold for henna tattoo!
We will not be at Midnight Sun this Saturday, 1/17/09! Perhaps next week. Until then, enjoy the work of a very talented artist!
Thursday, January 1, 2009
Bridal Henna - palms in process
 I wish I had remembered to take more photos of this bridal henna tattoo. We were actually able to finished the fingertips with bold tear drops, dots & flourished that met the pattern you see here in the photo.
 The finish for the backs of the hands featured compatible floral & paisley accents that were embellished with the little glove spots.. giving the look of wearing an old fashioned glove. As this was henna in the winter time, I used plenty of lemon sugar glaze to help the henna stay wet as long as possible & blow drying from time tot time to help open the pores.
It was important that we finish the henna as quickly as possible, so I will hope to receive photos of the finished color sometime next week. Stay tuned!
Tuesday, August 19, 2008
Bridal Henna for Back of Hand
 It is always wonderful to have friends! I am particularly grateful for those with the time and patience to help me perfect my skills.
This henna tattoo took about an hour and a half to complete. We were having a relaxed time, no stress or hurry, and didn't realize that time and passed so quickly. After we finished, we wrapped that tattoo in tissue and plastic to be sure to get the best color possible.
This paste, I included eucalyptus oil, clove oil, a bit of neroli & some cajeput. It was an invigorating mix that we both enjoyed. The henna flowed very smoothly from the "floral paper" cone, and I was able to provide several applications of lemon/sugar to the design to keep it moist as long as possible.
I will have finished color photos on Wednesday I hope, and will be sure to post them as soon as possible. Again, I was inspired by the many very talented artists who have so generously posted their work on line. Following their example, I did draw the primary design elements on the arm first, then filled those in, moving down to the hand and finally the fingers.
Monday, July 14, 2008
Bridal Henna for Back of Hand - Thanks Toni!
 Thanks to all the generous artists who post videos of their work in process! I have learned so much about how to layout the designs as a result of watching their work.
 I now use a a much thinner paste than I was using before, and a finer tip on the rolled cone.
I never did like mylar cones, but I found some floral plastic wrap that is comfortable to touch and responds well to pressure. It has a smooth feeling & I am not worried that I will "pop" it.
You may notice that I have a better grasp of the use of white space in this henna tattoo. In part, this is because I remembered to outline components when they were finished.
Of course one of the best blessings to henna tattoo practice is a willing & very still model. The success of this pattern is due in large part to my very patient model. Thanks Toni!
Saturday, July 12, 2008
Amazing "How To" Bridal Henna Video
This is one of the most useful live demonstrations of How To apply henna. I have learned so much watching this great artist fill hands with mehandi. I hope you enjoy it as much as I do.
Monday, June 30, 2008
Fine Line Henna Palm - Paste on skin
 After browsing through the collection of traditional henna tattoo patterns from India, my client chose this design.
To be sure, this is a modified version of the pattern as we were having henna party at the Midnight Sun. For a private party, please contact the studio by phone or e-mail. Henna is available by walk-in appointment only on Saturdays from 1:00 until 5:00 in Five Points.
Sometimes Spirit Vision Henna offers mehandi at the First Friday party in Five Points at Bead Here Now. The best way to get your henna is to give a call.
Friday, June 13, 2008
Bridal Henna Tattoo for Brooke - Original Henna Pattern

Brook designed this unique henna tattoo for her wedding day as we went along. I was very lucky to feel pretty good about drawing trees so that I felt pretty well qualified to help design the pattern for her.
She sent me some samples by email of styles she liked. As well, she looked through some of the pattern books I brought to our appointment before deciding on an asymmetrical tree design. The patterns she had sent me had a Turkish feeling which I tried to include in the style of the leaves, and the spacing of the lines.
The backs of the hands were done very simply, again with an asymmetric design offering an Arabic look. The pattern she chose for the feet was a traditional "sandal" style that mirrored the organic feeling of the palm pattern.
I hope to be able to post photos of the finished color for you soon. 'Til then, just click the image for a close up.
Wednesday, May 28, 2008
Bridal Henna for the Palm - A 35 Minute Design

Here is a photo of a traditional henna tattoo for the palm. The design is a synthesis of traditional India henna style and a touch of the bold Arabic fashion.
After viewing the work of many fine artists, and benefiting from some videos, I made a thinner paste than usual and used a mylar cone to create this tattoo.
With a thin paste (almost like tempra paint texture) and a very fine tip on the cone, I was able to do more intricate mehandi much faster than ever before.
I started at the top most portion of the wrist, marked out the primary design areas first, then filled those in with finer lines.
I followed the same process for the hand... which is how I achieved the reverse image paisley on the palm.
The dark centers of the flowers that surround the paisley help set it off. Each finger is different, which gives a spontaneous look to my eye. I will post the foot tattoo pattern tomorrow.
Sunday, July 22, 2007
Wrist Jewel Henna Tattoo

I remain thankful to Kimberlee, a henna artist in Jupiter Florida for recommending Sangeet's design book. Click the title of this post to visit Kimberlee's "space".
This fine line henna tattoo was made possible in part by mixing the paste to be rather liquid, sticky and stringy.
The addition of fenugreek seeds in the tea mix which I add when first mixing the paste helps create a stringy mix. Adding a bit of pomegranate juice just before putting the paste in the cone ensured the paste would be sticky and liquid. To get the fine line, I cut just a bit off the tip of a plain old plastic cone... and voila!
Tuesday, July 10, 2007
Bridal Henna - Recipe for dark henna color

As promised, here is a photo of the finished color, 24 hours after the paste is removed. This color will continue to darken over the next 24 to 48 hours. While it may appear that this is black henna, I assure you, no black henna was used.
I use only fresh Jamila Henna powder, which gives very good, dark color very quickly. This paste was made with lemon juice, lime juice, my henna tea blend and henna powder. After allowing the paste to rest for 12 hours, I added tea tree oil, lavender oil, neroil oil, geranium bourbon oil & a bit of eucalyptus oil.
To futher thin the paste, I added a bit of pomegranate juice. After the henna paste had dried on the skin, I sprayed it with a mixture of lemon juice, sugar & lavender oils all mixed together in a fine mist sprayer. I waited for the paste to be pretty dry on the skin before spraying with the lemon juice. I was able to spray the finished design serveral times.
To be sure I got the best color possible, I wrapped the design with tissue, and wore a plastice glove (the kind you might get for food service use) for several hours. Come back to visit again for more tips as I "discover" them.
Monday, July 9, 2007
Bridal Henna - Fine Line Henna Tattoo

Here is a photo of a traditonal henna pattern from a little design book I picked up at a local Indian market.
Of course, the pattern was far more intricate than this design as my model had small hands! None the less, I still practice full bridal every chance I get. I will post a photo of the finished color in the next few days. (Click the photo for a close-up view.)
Tuesday, July 3, 2007
Bridal Peacock Tattoo Movie

I am practicing my bridal henna and am lucky to have a willing model.
Of course I am inspired by the great henna art of SJ Henna in Singapore... as you can see by this design.
Click the HERE for a little music & "movie".
Spirit Vision Henna is available for Bridal Showers, Wedding Parties, and other events.
Visit my site for more information.
Monday, June 18, 2007
Traditional Indian Henna for Feet

Want to see all the images of this henna pattern? Just CLICK HERE for the slide show.
This is a Sunday afternoon henna moment for a friend. It was a very peaceful time, and a great help to me to be able to practice bridal style Indian henna.
Come back.. I hope to have photos in color soon.


